LTL Shipment to Amazon
LTL (Less than truckload) shipments are useful when you need to send large or multiple units into Amazon’s warehouses. Below I’ll cover how to create an LTL shipment.
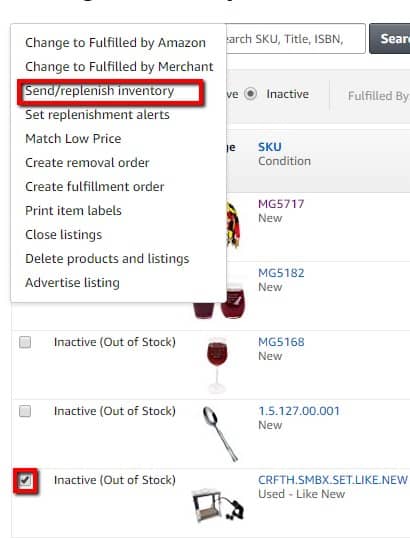
First, you will need to select the product(s) you want to ship in. Do this by going into your inventory and checking the checkbox next to the product(s) you will be creating a pallet shipment for. Then navigate towards the action drop-down menu on the upper-lefthand side and click on “Send/replenish inventory”.
This will direct you to the shipment creation page. On this page, you’ll want to select “Case-packed products” as the packaging type. This packaging type will help lower your chances of having your product(s) sent to multiple fulfillment centers.
Continue with the shipping plan and enter the box configurations. This means the number of units per box and the number of boxes for each product. Click continue. 
The next page will ask you who preps the products. Some products are required by Amazon to be poly wrapped or bagged. If your products are required to be prepped then you have to either select “Merchant” or “Amazon” under who preps. If you choose “Merchant” then you are responsible for prepping your products. If you choose “Amazon” then Amazon will prep your products and charge 0.50 cent per unit. If your products are not required to be prepped then you can leave as is and continue to the next step in the shipment process.
Note: Amazon will let you know if your products require prepping. 
The next page is similar to the previous step. You will need to tell Amazon who will apply labels to the product. You have an option to apply the labels yourself or pay Amazon to apply the labels. If you choose Amazon, it will cost 0.20 cent per unit. If you choose to apply the labels yourself, click the print label button. This will download a pdf file with the number of product labels you need. In the example shipment, I have 40 units. This means I’ll be given 40 product labels, 1 product label per unit. Product labels need to be applied to the product itself. 
The next step is a review of your shipment. Here it will tell you where your shipment is being sent. You also have the option to name your shipment. I recommend naming and dating the shipment for record purposes. After naming your shipment, click on “Approve & Continue”. Now you can work on your shipment!

After clicking the “Work on shipment” button, you’ll be directed to the final step in the shipment process. In this step, you’ll need to tell Amazon if this shipment is an SPD (Small parcel delivery) or an LTL (Less than truckload). Since you are shipping as LTL you’ll also need to confirm the box configuration, give pallet dimensions, print labels, and schedule a pickup date.
Select LTL and keep the shipping carrier as “Amazon-partnered Carrier”.

Under “how will the shipment be packed?”, select multiple boxes. Here you will need to confirm the box configuration by entering the shipment quantity again. Now click confirm and generate box labels.
Box labels will need to be applied to the outside of each box. In the example shipment, I have 40 boxes. This means I’ll be given 40 box labels to print, 1 box label per box. Box labels will always be applied by the merchant. 
In the next step, you will need to enter your pallet dimensions and weight. But first, you’ll need to get your pallet built out and weighed. After entering the pallet configuration, you can schedule a pick up ready date. This is not the day your pallet will be picked up but rather the day you let the freight forwarder know that your pallet is ready for pickup. Pickup usually takes around 3-7 days after scheduling the pickup ready date. The BOL will auto-generate a day before the freight forwarder comes to pick up your pallet. Once you receive the BOL, this means your pallet will be picked up soon.
Agree to the terms and conditions and accept the charges. If you’ve already accepted charges but need to make changes to the shipment then you have 1 hour after accepting charges to cancel the shipment. If it has been over 1 hour, then the shipment is locked in and cannot be canceled. 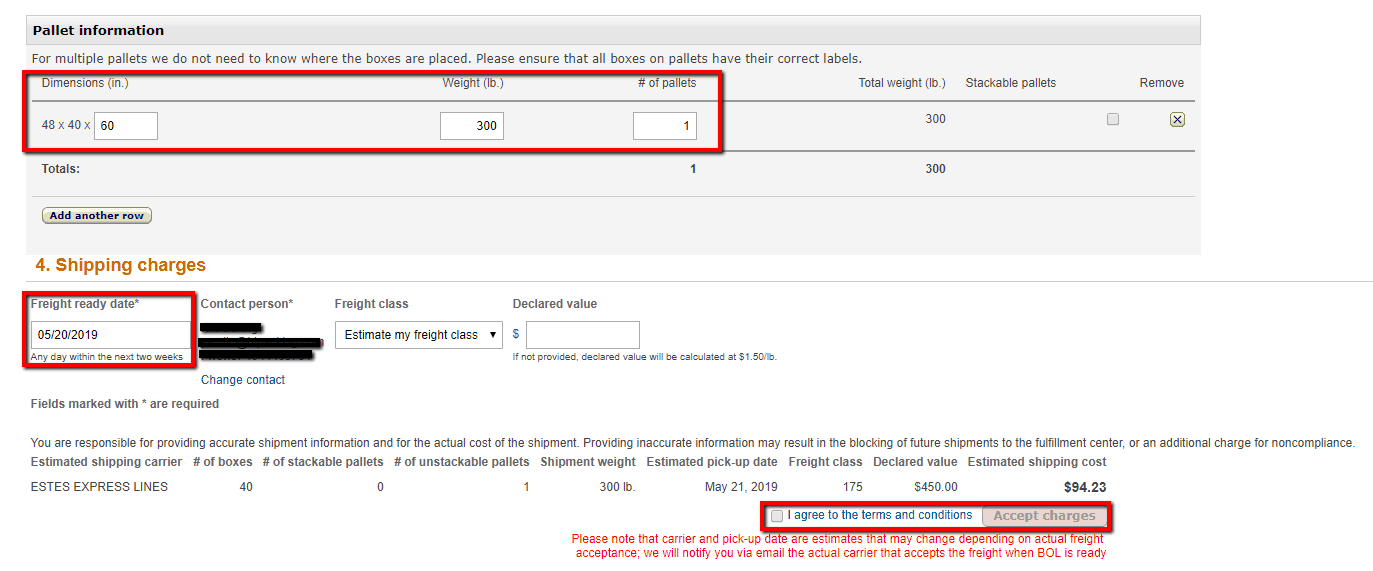
Now you can download and print the pallet labels. You will be given 4 pallet labels per 1 pallet. These 4 pallet labels will go on each side of the pallet. Make sure this label is on the very outside of the pallet so the driver can scan the pallet labels when picking up your pallet. This completes your LTL shipment!

If you need any assistance with Amazon shipments, contact us here!


