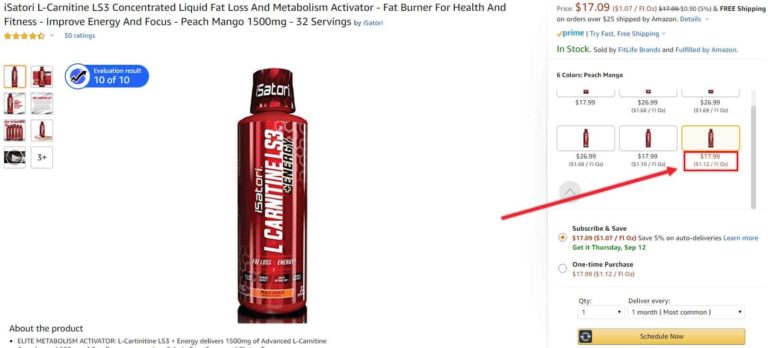
What is Minimum Advertised Price?
MAP is the lowest price that can be advertised for a product. There is a value in the back-end of each listing with the MAP. If the price ever falls below this number, Amazon will hide the offer price. You will want to make sure that the MAP is low enough whenever you run a promotion. To prevent Amazon from hiding your price you will need to edit the MAP in the back-end.
“Price Hidden” on Offer
Amazon will hide the price of your listing if the price offered falls below the Minimum Advertised Price (MAP). Amazon forces customers to click on the “See More Buying Options” section in order to see the price. This is obviously detrimental to sales as customers won’t be able to see the price when your ads show up.
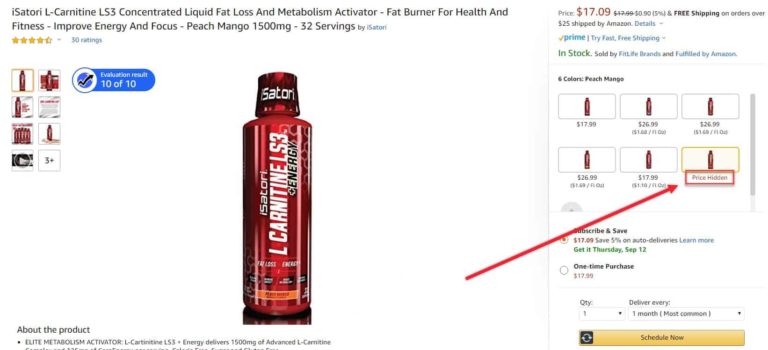
How to Update Minimum Advertised Price (MAP) to Remove “Price Hidden”
The most efficient way to update the MAP is via a template upload.
Template Upload
#1 – Using a template upload is the most effective way of updating the MAP. This will change MAP in the back-end of the listing. How to Download a Template File: #1 – Go to the Seller Central homepage and move your cursor to the ‘Inventory’ tab and click on ‘Add Product Via Upload’ https://sellercentral.amazon.com/listing/download

#2 – From this page, you will click on ‘Download an Inventory File’. Then you will select the category of the file by choosing the category and subcategory in the Product Classifier.
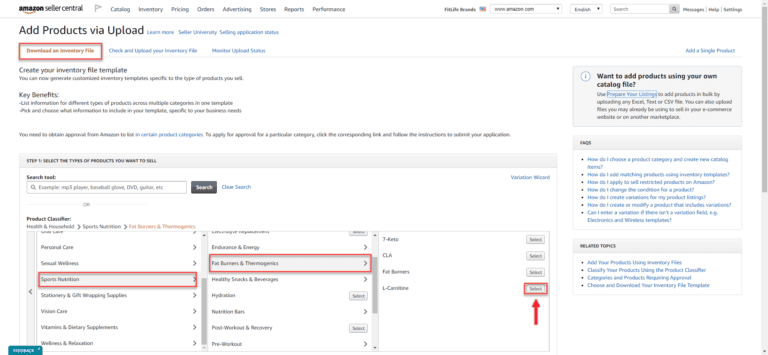
#3 – Verify that the correct category is selected then click ‘Generate Template’

After the template file has been downloaded, you will need to fill it out with the product’s SKU, Standard Price, and new MAP. Unfortunately, the section for updating MAP is no longer included in the standard template download. Luckily, you can simply add the field name code. The section highlighted below is the only one that needs to be filled in to update the MAP, no need to add extra information. #1 – Open the Template file and fill out the item SKU and the Standard or Current Price.

#2 – IMPORTANT – Make sure you fill in ‘PartialUpdate’ in the section labeled ‘Update Delete’. PartialUpdate will allow you to update the back-end of the listing without deleting the other back-end data.

#3 – You will need to add a column in the Offer Section by right-clicking and selecting “Insert Column”. Then you will add the field name code by typing “Minimum Advertised Price” in Row 2 and “map price” in Row 3 of the newly created column. You will then be able to add the new MAP price. Make sure the MAP is low enough to give you room for promotions.

Once the file has been updated, you will then upload it to Amazon by returning to the template download screen on Seller Central. #1 – Click on the “Check and Upload your Inventory File” tab. #2 – Verify the File Type is “Inventory Files for non-Media Categories” #3 – Upload your file #4 – Enter in your email – they will alert you when the upload is complete #5 – Click “Upload”
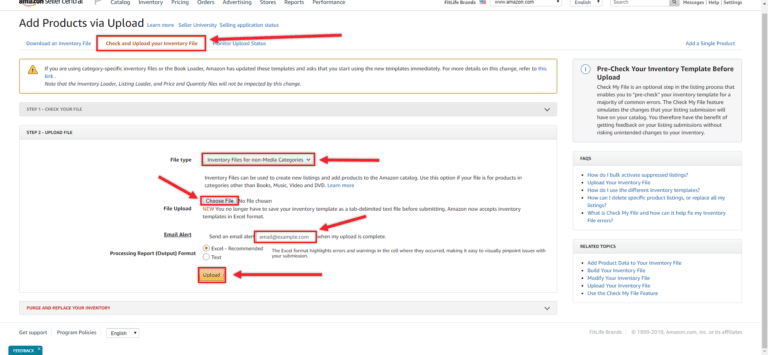
The status of your template upload can be seen in the ‘Monitor Upload Status’ tab. Once the upload is complete, you will be able to view the Processing Report. The Processing Report will verify is the upload was successful or not. Errors will be displayed in the file with instructions on how to fix them. Otherwise, a success message will be displayed.

Amazon will process the file and apply the MAP changes to the back-end within 1 hour. Sometimes you may need to file a ticket to push Amazon in the right direction and check back with your “processing report” mentioned in the paragraph above. Once the MAP has been officially changed, Amazon will remove the “Price Hidden” label and you will be able to see your price again.
